Subjects
: What equipment do I need -
Step by step instructions - Faq - Trouble
shooting.
What equipment do I need to Technoweld ?
The basic equipment requirements are:
- A techno weld kit
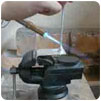
- A heat source
A heat source is anything that can heat the aluminium you
are working on to a temperature of 380°C. This has ranged
from a charcoal fire to sophisticated induction system. In
most cases it will be a gas torch. The best fuel to use is
propane, and for professional use we recommend the Primus
Sievert "Sievermatic" torch.
The size of burner used depends on how big the Aluminium is
with which you are working. Basically a small flame for
small job and a big flame for bigger jobs.
Remember - Aluminium is very good at getting rid of heat -
so you need to put in heat faster than the Aluminium loses
it. It is not the temperature of the flame that is
important it is the volume of heat it generates.
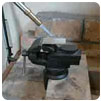
Large components like cylinder heads can be preheated in an
oven or over a gas ring to get "background" heat into the
work piece , and then a standard gas torch
It's also a good idea to have an insulated working surface
to put larger workpieces on Firebrick is ideal.
Step by Step instructions.
These are the basic simple steps in using Techno Weld. Full instructions, written and illustrated, are included in the TECHNO WELD kit
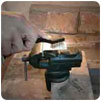
Step 1 - Cleaning
Clean the area to be welded thoroughly with the Stainless Steel Brush, which is supplied in the Techno Weld Kit.
Step 2 - Heating
Heat the area evenly keeping the flame moving. Start
heating back from the area to which you wish to apply the
TECHO WELD rod. Move the flame away and touch the TECHNO
WELD rod on the surface of the aluminium where you wish to
apply the material. As soon as the aluminium is at 380°C
the rod will melt.
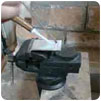
Step 3 - Coating
Coat the surfaces to be joined with a thin layer of TECHNO
WELD , in the same way as you would "tin" a solder joint.
The aluminium must be hot enough to allow the TECHNO WELD
rod to form a silvery trial.

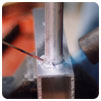
Step 4 - Abrading
A thin layer of oxide will have formed between the TECHNO
WELD and the surface of the aluminium. This needs to be
broken and it is done by drawing the Stainless Steel
Abrader through the molten TECHNO WELD.
Step 5 - Joining
If you are joining aluminium pieces, coat both sections
with TECHNO WELD as outlined above, jig them together and
just evenly re-heat the aluminium surrounding the coated
area until the TECHNO WELD remelts and the components
"sweat" together. Draw the stainless steel Abrader, through
the molten TECHNO WELD at the joint face to make a neat
fillet.
Step 6 - Cooling
The fusion weld will cool and harden in a few seconds, just
let it cool naturally, and as soon as the aluminium has
cooled enough for comfortable handling it can be ground,
machined, drilled, tapped plated or painted as required.
Building up
TECHNO WELD can be built up to replace/repair missing
parts. Just follow steps 1-4 above, then once step 4 is
completed heat the TECHNO WELD rod in the flame until it
melts onto the coated aluminium, gently working it in with
the Abrader
Frequently Asked Questions
How strong is it?
A properly made Techno Weld joint is at least as strong as the parent metal.
What thickness of Aluminium is it possible to repair ?
Any thickness from .0005 " to any size, provided you have the heat source to get the joint area to 380°C
What preparation/cleaning is necessary?
Just clean away excessive oil and dirt from the joint/repair area with brush or chemical cleaner and then finally, thoroughly clean the joint/repair area with the Stainless Steel brush.
What alloys work with TECHNO WELD?
Cast Aluminium (Cylinder Heads, Blocks, Transmission casings, Brake calipers,etc)
Magnesium/Aluminium castings
Aluminium Extrusions
Duraluminium
Birmabrite (Land Rover/Range Rover bodies)
Mazak (zinc based alloy) door handles, carburettor bodies, trim etc.
Titanium
Techno-Weld fusion-welds all of these metals, and will also weld dissimilar types of Aluminium together.
How safe is TECHNO WELD to use?
Techno-Weld is entirely safe to use. There are no noxious materials , gases or substances. There is the remotest chance of a zinc oxide fume if used over an extended period (some hours) in a confined space, at temperature higher than that at which Techno-Weld is used. Like all brazing and welding processes , protective clothing and eye wear should always be used. This is clearly stated in the instructions.
What kind of Joints can you make ?
Any type of joint is possible using Techno Weld
Can you fill holes with TECHNO WELD?
Yes!
Can you build up missing parts with TECHNO WELD?
Yes!
Can TECHNO WELD be Chrome plated?
Yes!
Can TECHNO WELD be used on Anodised Aluminium ?
Yes provided you remove the anodised coating in the repair area.
Can TECHNO WELD be anodised ?
No (unless the area is nickel plated first)
TROUBLE - SHOOTING
There is only one major problem, and that is people don't read the instructions!
This leads to one of two problems (and they really are the only two) :
1. People will heat the welding rod in the flame.
This results in the TECHNO-WELD melting onto the Aluminium and doing nothing (other than rolling off!).
Explanation
It is essential that it is the heat from the workpiece that melts the rod. This is the only way you can ensure that the TECHNO-WELD and the Aluminium are at 380°C at the same time
Molecules of Aluminium start to leave the surface at 380°C and TECHNO-WELD "grabs" these molecules to start the process. If TECHNO-WELD is at 380°C before the Aluminium, it has nothing to "grab".
2. The joint cracks or TECHNO-WELD lifts from the edge of a repair
This results in a weak joint that will fail under stress or a repair that will probably "pit" on dressing back.
Explanation
This is caused by the Aluminium cooling too fast. The Aluminium must be heated in a general area around where the repair is to take place. There should be sufficient heat in the Aluminium to keep the TECHNO-WELD molten on the surface for at least 6 seconds. On large section aluminium castings (cylinder heads, crankcases etc.) 15-20 seconds.
This slow cooling allows TECHNO-WELD to form a large, strong crystalline structure. Fast cooling results in small "granular" structure which is inherently weak.
If the problem occurs - reheat the job, (not directing the flame onto the Techno-Weld) until the TECHNO-WELD remelts and let the job recool on the time indications given above.
Large Aluminium workpieces should always be preheated with a big "fluffy" flame or in an oven up to 200-250°C (Gas Mark 9!)